Home

Saturday, September 10, 2011

Christmas craft/s

While on the holiday theme, let's look at Christmas! I have a foyer that has 2 steps up to a 3x3 foot landing that leads up to more stairs (to upstairs).... anywho, there's a 'waste of space' that no one walks on and I'd like to put something there to help bring interest to the landing, or decorate it for holidays. Last year I put a tall-ish clear straight sided vase filled with Christmas balls. You might have seen that done in stores. Yeah well, the vase was too small because once you look down the stairs there was this random vase with balls sitting at the bottom.

SOOOO thanks to Laurie at TipJunkie.com I found this new little diddy that I want to try and do for my stairs, making different levels to hopefully fill the space without taking away room to actually walk up the stairs.

I just realized I could use wrapping paper instead of their use of fabric. (much cheaper)

Hallowe'en craft/s

I found a feature on www.tipjunkie.com that I love, I love her site to start with but this is fabulous!!! This Hallowe'en pumpkin is made from paint chips (Hello Home Depot!) and paper leaves. LOVE THEM!

Changes

Well, apparently I havent been on here in a while. And by while I mean a LONG time!

I have been surfing blog land and see such great ideas. This blog is my bucket list, to do. I should be adding things to my to do bucket list!

So that's what I'm going to do. I'll be doing a post on a DIY craft/project I want to do and link to the blog/site I see it on.

Monday, June 06, 2011

only 20 days to go

I have been planning Tea for Three at 3 for about 6 months now and am down to 20 days. We are celebrating her 3rd birthday on the Saturday after (it's on Friday).

Here's my to do list:
- finish coffee filter wreath
- 'tea wreath' - with tutorial
- delivering invitations - have less than 3 weeks
- home made tiered cake stand - with tutorial
- finalize the menu, print it to display it
- figure out a layout of tables where things are going and how it will all look
- think about decor items and create any that are needed

I have so many items and colours in this party I need to figure out what my colour scheme is before making the tea wreath and cake stand. I think with all my scrapboooking papers thought I'll find something ;)

So here's my plan of attack...
Lay out (and take a picture) of all the colour items. Pick new scrapbooking papers for the new items yet to be made. Make items. Take pictures of items while making to put up new posts and tutorials on my blog.

I think I might be using the word 'tutorial' too often in this post.

So to get this party started I'm going to post this, finish my coffee and get going.

Friday, May 27, 2011

Coffee filter wreath - picture heavy tutorial

My newest craft project is to make a coffee filter wreath. I have seen so many variations online and had to piece together the steps for it.

I started last night on the first 2 layers of it. I started long before with buying 2 packages of 650 coffee filters - you read that right, might only need 600 but I'll have extra - and a styrofoam wreath and hot glue gun sticks.

I took pictures of how I started and different stages and supplies; as my wreath progresses I'll be taking more pictures and do a tutorial when it's done.

So it's now been a while and I have covered a side and top and am working on the inner circle.

I'm now going to figure out how to load any of the pictures I've been taking along the way and help do a step by step tutorial.


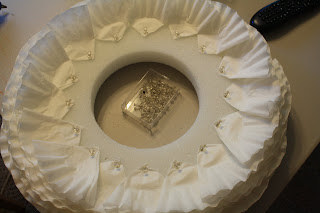
I didnt take a picture of folding the coffee filters but I started with round, flat bottomed ones which have the wavey edge and folded them in quarters to get a triangle point in the flat bottom (but not bending the wavey edge). I started on the 'bottom' of my wreath hot gluing the triangles about an inch apart.


Layers and layers of filters and it's only going to get poofier! (it's a word)


This one's more of a top view to show you one row on the 'bottom' of the wreath.

Tomorrow I'll upload more pictures of the 'top' and to the point I have completed, so far.

Alright, after working some more on it this morning and giving myself a blackeye... I've decided to blog about it and take a break.


In the 2 above pictures, I flipped my work around and will now be working on the 'right side'.There are about 12 papers per row... it's a 12" wreath.

In the next picture you'll see that I had to get inventive and used pushpins. The filters werent staying in place, because of their curve. So I held them in place while the glue set. I was stopping every couple pins and pulling them out, but then thought "why not just do it all at the end". And that's what I did. I'd do a circle of filters and pin as I went then pull them out; by the time I got to the last one it was set enough. Any time a pin actually got glued I was able to twist and pull it out (gently).


The next ones show there's actually a curve to the filters when folded... I found using the same curve helped. First one is showing the top and the second shows the side I glued on. Keeping them the same may have an impact, I just like the neat look using one way gave so I stuck with it.


Now, looking over what I just uploaded, it appears I wasn't clear in showing, or explaining... The first couple rows have the tips of the filters folded to point up and are only glued about a centimeter then pinned. The best judge for where to place the next row of filter is to do a dry placement and see where it will line up with the previous. Pick up the wreath and look at it from arm's length. There's no hard and fast rule about where they go but the overall look is to be really full looking. You'll see that it gets really tricky when you get closer to the middle. While working on the side of the wreath I continued with the 1 inch space between tips and every row was staggered so I always saw the previous tips as I was laying the new ones.

Here are more pictures


As you can tell, the rows grow quickly and get really full, really fast. Just keep going around and around until...
You're working on the top... I put them about an inch in (still an inch apart at the tips). It's all kinda a guessing game on placement, but as you progress, you'll see where they just naturally want to go.
This next one shows 2 rows along the top... The filters without the pins are the previous rows but it also shows just how I staggered the placement, this pattern was continued from the beginning and is the best explanation I can do.


Okiedoke... Keep going with the tips staggered and about an inch apart until you reach the inner edge of the wreath.... then....


You're finally almost to the most awkward area of the wreath.... Earlier on I was using glue just on the tip of the filter, now I started using 2 pumps of glue covering most of the triangle and had to use 2 pins per filter BUT on a great note, each row takes less and less time because there are less filters to put on to fill the same space. This is the time that I started to get the most burns... I burned my right pointer finger while trying to hold part of the filter in place while I pinned it and in reaction to that I had hot glue flying on to my right forearm and ended up with missing skin under the 3rd degree burn I gave myself. I thought I'd be smart and use my pointer nail to hold the pieces in place; until I glued a pushpin to my nail. I had to take a break at that point.

I'm going to show more progress by pictures.


More to come, later.

Tuesday, May 24, 2011

Weight loss and illnesses

I have been sick for almost 3 weeks with laryngitis and noticed last week that I had lost about 14 pounds. Part of the reason for the length is that I had both viral and bacterial forms; I was on antibiotics for 10 days, starting 2 days in and was still having trouble and sore for a couple days after. Today was an additional 2. I thought, since I've been trying to loose weight, I'd track it and created a ticker for it but I can't figure out how to add it to my side bar. That will come shortly. I have it on my Google home page, that's a start, right?


Over the last 5 months I have been having hives and welts appear on my body with has been documented so that when I see my Allergist in Victoria in November (10 months after first out break) I can recount what, when and for how long. I am currently taking 2 Benadryl twice a day and 1 Zantac twice a day. Benadryl and Zantac are anti-histamines for histamine reactors 1 and 2, respectfully. At this point, instead of saying that I am allergic to myself (and people think I'm crazy) I am now saying I have an undiagnosed auto-immune disease. All of my medical issues - Meniere's Disease, Hypothyroidism, and Restless Leg Syndrome could all be linked some how.

Monday, March 21, 2011

Adding Buttons/Gadgets how to

Thanks to my uncommon slice of suburbia  I have linked to Mommy's Idea and figured out how to add her button to my right bar. One step at a time and I will be learning something new!

Monday, February 21, 2011

Free Printables

There are so many sites that have printable ideas - cards, recipes, menu planning and recipes - I have started some of my own, collected and dowloaded lots but have no real way of organizing them all and the ideas within them. I will figure a way to post the actual files on the blog or shots of them to send them out where possible. I'll provide links to ones that aren't mine.

If you have (assuming I'll have more readers) requests for ideas I'll either find them, or create them.

My next project to work on is a birthday and mailing list binder to go with my hand-made cards.

I currently have a year in calendar to help with cleaning and meal ideas.

So after many months I am doing an update to this post! It's been too long in collecting documents, making my own and collecting them all into files and folders in various locations on the computer that I still haven't made my binder. 

Last night when I couldnt sleep, I made a list of what I need/want to have in my binder, to help myself narrow down and actually get this thing done to help get organized!

My list of documents is: 

Year, month and day calendars 
Schedules of Strong Start and Parks and Rec 
Garbage collection 
Address including birthdays of friends, spouse and kids 
House cleaning schedule
Cleaning tips like this one that i have found from Martha Stewart
Babysitting info (not that she ever has, but for the future)
52 weeks organization (filled in of course) from Org Junkie
Menu planning for summer and winter with 4 weeks of each (for rotation)


Can you tell that I love Org Junkie? (no link here)
 

Sunday, February 20, 2011

New follower and design

Creating a blog is not as easy as I thought. I have been using Google's Blogger help Getting Started Guide which has answered a lot of questions. I've also used Momma Go Round's tutorial here

Just friggin figured out how to link ... all be it the long way but I have created a link!!! and now Dan just showed me how to do the "LINK" button. dammit oh well. 

I also have a friend following, my first. Thanks Michelle!

Just starting out

I know at this point I have no new readers, or any for that matter. I have been reading blogs for months and have so many ideas that I would like to start to organize them all on one place, not just my favorites :)

My plan is to blog about ideas that I have found and take pictures of my results; where possible.

I'm a crafty person by nature and have just been going in over drive seeing all the great ideas on the blogs that I follow. I'll be adding great bloggers as I come across other ideas.